Ultimate Fooocus Inpaint Tutorial – Step by Step Image Transformation

Introduction
Hello there and welcome!
Inpainting, is an incredibly powerful function, that allows you to modify or enhance an existing image.
You can selectively edit specific areas of an image, and let Fooocus fill in the gaps in a realistic and coherent way.
In this detailed step-by-step tutorial, I’ll be covering all 4 inpainting methods, and show you how to produce the best results for each of them.
I’ll be walking through worked examples, of some of the most common tasks that you’ll want to do with inpainting.
I’ll be running through everything, on a standard local install of Fooocus, running on a Windows 11 PC.
So, let’s crack on.
Inpainting Methods
There’s 4 main inpainting methods:
First. Fix. When you want to FIX or IMPROVE specific parts of an existing image, such as crooked teeth.
Second. Change. When you want to completely CHANGE or REPLACE specific parts of an existing image, such as clothes.
You can also change or swap an entire face of a person with another face. I’ve already done a detailed video on face swapping in Fooocus, so I won’t be covering this specific change in this video. If you want to take a look at that detailed face swap video, I’ll leave the link to it in the description below for you.
Third. Add. When you want to ADD an object to an existing image, such as an item of jewellery.
Fourth. Remove. When you want to REMOVE an object from an existing image, such as a clothing accessory.
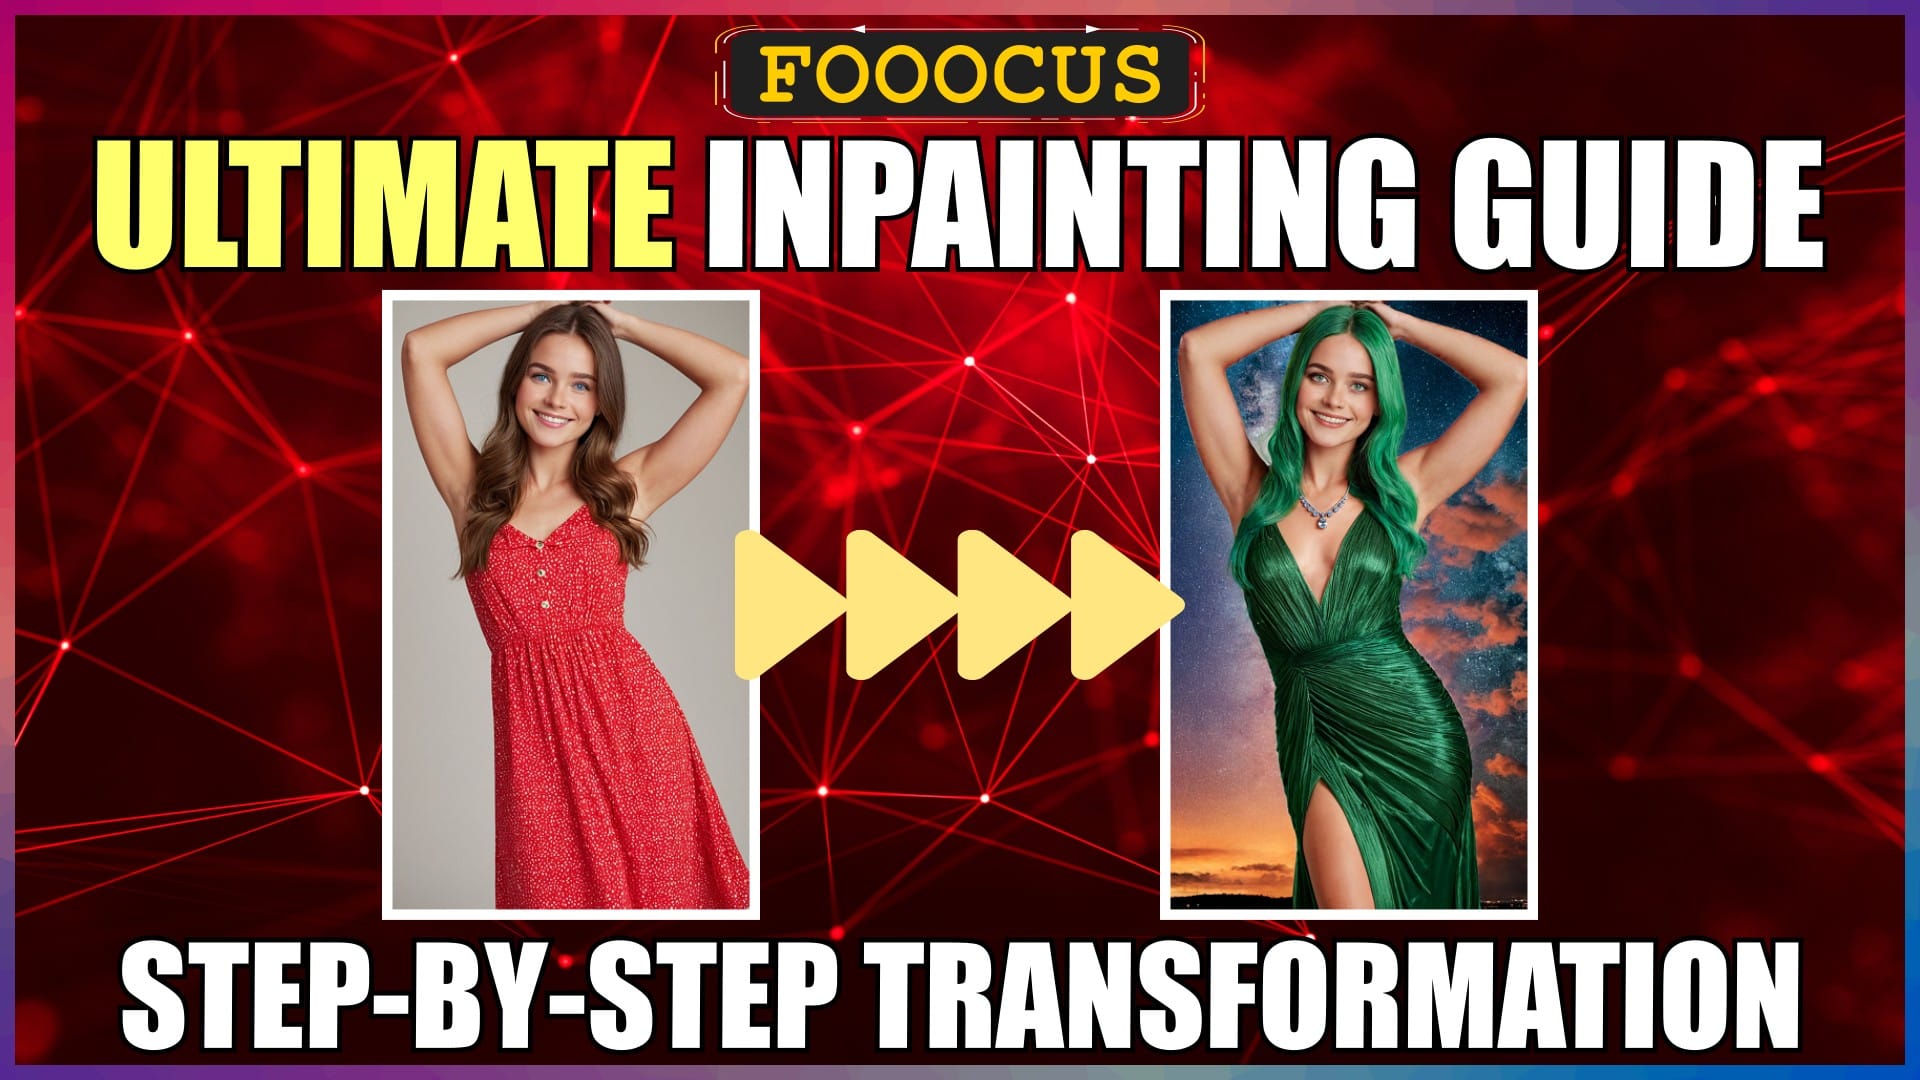
Inpainting Transformation Overview
Let’s take a quick look at what we’ll be stepping through in this video.
We’ll be completely transforming the image on the left, into the image on the right, through a series of progressive inpainting walk-throughs.
We’ll take the image on the left, and FIX the eyes, FIX the teeth, CHANGE the hair, CHANGE the dress, ADD a necklace, REMOVE the belt and lastly CHANGE the image background.
These image changes will cover all 4 inpainting methods, so that you’ll then know how to tackle any inpainting task that you may come across.
If you’re only interested in a specific inpainting step, I’ve left the timestamps for each of them in the description below, so that you can just jump straight to that specific section. However, it’s a good idea to watch the preceding sections as well, as I’ll be dropping a number of important tips and best practices, to achieve the best results, as they arise in earlier sections.
It’s worth pointing out, before we get into the inpainting, that you could just fix or change multiple aspects of the image in one go, for example, fix the eyes and teeth at the same time, using inpainting, but I always tend to get better results by doing each fix or change separately, so that’s what we’ll do in this video.
Anyway, let’s tackle each of these inpainting tasks in turn, and walk-through the steps to achieve the best results in each case.
Starting Base Image
Let’s take a quick look at the details of our base image, that we’ll use as the starting image to progressively transform with inpainting.
I previously generated this image with Fooocus, using the parameters that you can see on the screen.
OK, now we know the details of the starting original base image that we’ll work with.
Base Settings
Before we get into the actual inpainting, let’s make some adjustments to the settings, that we’ll use for all the inpaint generations going forward.
Inpainting will regenerate only the specific parts of the image that we specify through masking, so different settings will affect and produce a different outcome for those masked areas.
On the settings tab, we’ll use “Quality” for performance, which regenerates using the maximum 60 sampling steps, for a higher quality result.
The “Aspect Ratio” is NOT used when inpainting, so we can just leave this at the default, which is actually different to the 3:5 original image aspect ratio.
Image Number, we’ll put at 1, as we only want to generate a single result each time.
For “Seed”, we’ll use our original image seed. Using a different seed, or a random seed WILL affect our final image generation of the inpainted areas, but not the rest of the image. If you don’t get the result that you want when generating, then you can try changing the seed or using a random one.
On the “Styles” tab, the selected styles WILL affect our final image generation of the inpainted areas, so we’ll just use the defaults that were used to generate the original base image, which are V2, Enhance and Sharp.
On the “Models” tab, we’ll use the “Juggernault” checkpoint and “SDXL Offset LoRA”, that we used to generate our original base image. Again, the checkpoint and LoRA WILL affect the final image generation of the inpainted areas.
The only other setting that we need to make sure that we know about, to adjust for different inpainting tasks, is inpaint denoising strength.
To find the inpaint denoising strength, select the “Advanced” tab, then tick the “Developer Debug Mode” checkbox, and then select the “Inpaint” tab.
Scroll down a bit, and you’ll see the “Inpaint Denoising Strength” setting.
It’s currently set at 1, although this default value changes depending on which inpaint method we select later on.
Inpaint denoising strength determines the degree to which the inpainted masked areas will be changed.
The higher the inpaint denoising strength, the greater the change.
Anyway, that’s the base settings covered, let’s move onto some actual inpainting.
Fix and Improve Eyes
Let’s start off with fixing and improving her eyes.
We can see the full base image on the left, which looks pretty good.
On the right, is a zoom in on her face. Our original text prompt asked for “green eyes”, but they turned out blue, for some strange reason. I also think her eyes would look better, if they were slightly bigger and had less puffiness under them.
We’ll use inpainting to fix and improve these eye details.
We’ll switch over to Fooocus.
We have all our base settings already applied, that we walked through in the previous section.
Below the text prompt box, we’ll tick the “Input Image” checkbox, and then select the “Inpaint or Outpaint” tab.
We’ll then drag our base image into the inpaint image box.
We only want to change the eyes, so we need to inpaint or mask, only those parts of the image.
If you’re new to inpainting, then hovering over the info icon in the top left of the inpaint image box, will give you a number of really handy shortcuts.
We’ll zoom in on the eye area of the image, using “SHIFT” and our mouse wheel.
Let’s reduce the size of the brush, using “CTRL” and our mouse wheel.
Then all we do is paint in her eyes using the brush, to create a mask over them.
It’s best to go slightly outside of the eye area, for better results and blending.
OK, that’s her eyes isolated and masked.
Then we just hit “R” on our keyboard, to reset the zoom level.
Below the inpaint image box, we can see that the “Method” option is set to the default “Inpaint or Outpaint”.
If we drop down this options box, we can see two other custom inpaint methods.
I know a number of people inpaint using only the default “Inpaint or Outpaint” method, but I’ve always found that the other custom options produce better results, so these are what we’ll use.
To fix and improve the eyes, we’ll select the “Improve Detail” method.
The default “Inpaint or Outpaint” and “Modify Content” methods use a default inpaint denoising strength of 1, and the “Improve Detail” method sets a default strength of 0.5.
This is a comparison of using different denoising strengths for the eyes, and keeping all other settings as we just ran through, so that you can see the huge difference in results.
A low denoising strength of just 0.25 is too low to allow enough change from blue to green eyes.
At the other end, a high denoising strength of 1, introduces too much change and deformations.
I like the result, from the default strength of 0.5, so we’ll keep it at that.
When we previously selected the “Improve Detail” method, an “Inpaint Additional Prompt” text box appeared below the inpaint method box.
This is where we add our eyes specific prompt for the outcome that we want.
I’ll add in “highly detailed beautiful green eyes”.
Then we just hit the “Generate” button.
Let’s take a look at the result.
On the left, we have our original base image, and on the right, we have our newly generated “green-eyed” image.
I think the result is excellent.
Even though we just changed her eyes, it’s pretty interesting how different the overall face looks, even though all the other parts of her face are exactly the same.
Her eyes are a slightly different shape from the original, which I’m not bothered about, and anyway, I think they actually look better.
If you did want to keep a stronger similarity to the original eye shape, then you can adjust your mask shape to more closely follow the eye shapes, and also play around and reduce the denoising strength a tiny bit.
OK, that’s her eyes fixed, let’s move onto the next inpainting task.
Fix and Improve Teeth
Let’s move onto fixing and improving her teeth.
Back to the original base image and zoom in on her face.
We can see that the teeth are not the best, with some deformation occurring on the front teeth.
We’ll use inpainting to fix and improve these teeth details.
We’ll switch over to Fooocus.
We have all our base settings already applied.
This time, we’ll drag our previously generated “green-eyed” image into the inpaint image box.
Now we’ll do a quick mask on her teeth, to isolate them for fixing.
It’s best to mask over the whole mouth area, to improve blending and the final result.
Again, we’ll select the “Improve Detail” inpaint method, which comes with a default inpaint denoising strength of 0.5, which is fine.
In the “Inpaint Additional Prompt” box, we’ll add “highly detailed beautiful smile with perfect teeth”.
Then we just hit the “Generate” button.
Let’s take a look at the result.
On the left, we have our original base image, and on the right, we have our newly generated “fixed teeth” image.
Again, I think the result is excellent, and certainly a big improvement with seamless blending.
OK, that’s her teeth fixed, let’s move onto the next inpainting task.
Change Hair Colour
Let’s move onto changing her hair colour.
Now that she’s got green eyes, I think green hair would match a lot better and look more environmentally friendly, so let’s inpaint and change her hair colour from brown to green.
As well as changing her hair colour, we COULD also change her hair style, but on this occasion, we’ll let her keep her long hair style.
We’ll switch over to Fooocus.
We have all our base settings already applied.
This time, we’ll drag our previously generated “fixed teeth” image into the inpaint image box.
Now we’ll do a quick mask on her hair, to isolate it for change.
It’s best to mask slightly outside of her hair, to improve blending and the final result.
This time, we’ll select the “Modify Content” inpaint method, which comes with a default inpaint denoising strength of 1, which is fine.
If we used a denoising strength of only 0.5, like we did previously when we fixed the eyes and teeth using the “Improve Detail” method, then it wouldn’t allow enough change to take place, and she would end up with mostly grey hair rather than green hair.
Also, if we did use the “Improve Detail” method, that we used to fix the eyes and teeth, but even increased the denoising strength to 1, you WOULD end up with green hair, but the resulting hair would look a lot more flat and less natural than using the “Modify Content” method. Of course, depending on what you’re looking to achieve, this could be an option.
Anyway, moving on.
In the “Inpaint Additional Prompt” box, we’ll add “highly detailed long green hair”.
Then we just hit the “Generate” button.
Let’s take a look at the result.
On the left, we have our original base image, and on the right, we have our newly generated “green hair” image.
Again, I think the result is very good indeed. The hair isn’t as full and thick as the original, but I’m OK with that.
The overall blending is good and even the regenerated dress over her right breast, where the green hair no longer covers, has been matched pretty well.
OK, that’s her hair colour changed, let’s move onto the next inpainting task.
Change Dress
Let’s move onto changing her dress.
Now that she’s got green eyes and green hair, I think it’s only right that she should have a matching green dress that’s a bit more fancy as well, so let’s inpaint and change it from a red daytime dress to a green evening dress.
We’ll switch over to Fooocus.
We have all our base settings already applied.
This time, we’ll drag our previously generated “green hair” image into the inpaint image box.
Now we’ll do a quick mask on her dress, to isolate it for change.
To save the manual masking job, we could use an advanced automatic mask, but because of her hair strands covering parts of her dress, the auto mask won’t work very well.
If you have no idea what I’m going on about, don’t worry, we’ll take a look at the auto masks when we change the image background.
It’s best to mask slightly outside of her dress, to improve blending and the final result.
Again, like with the hair colour change, we’ll select the “Modify Content” inpaint method, which comes with a default inpaint denoising strength of 1, which is fine.
In the “Inpaint Additional Prompt” box, we’ll add “highly detailed green evening dress”.
Then we just hit the “Generate” button.
Let’s take a look at the result.
On the left, we have our original base image, and on the right, we have our newly generated “green dress” image.
I think the result is excellent. It adhered to the prompt exactly, in changing the red daytime dress for a green evening dress.
It’s actually gone one step further and added a belt to the dress. Although it does actually suit the dress well, we’ll be removing the belt, in a later step.
OK, that’s her dress changed, let’s move onto the next inpainting task.
Add Necklace
Let’s move onto adding an object.
In her new fancy green evening dress, her neck looks a bit bare, so let’s inpaint a chunky diamond necklace on her.
We’ll switch over to Fooocus.
We have all our base settings already applied.
This time, we’ll drag our previously generated “green dress” image into the inpaint image box.
Now we’ll do a quick mask around her neck, where we want the necklace added. If we wanted a thin necklace, then we would paint in a thinner line. We want a chunky necklace, so we’ll use a bigger brush.
Again, we’ll select the “Modify Content” inpaint method, which comes with a default inpaint denoising strength of 1, which is fine.
In the “Inpaint Additional Prompt” box, we’ll add “highly detailed huge diamond necklace”.
Then we just hit the “Generate” button.
Let’s take a look at the result.
On the left, we have our original base image, and on the right, we have our newly generated “necklace” image.
Again, an excellent result, I think. A nice chunky diamond necklace, exactly like we wanted.
OK, that’s her necklace added, let’s move onto the next inpainting task.
Remove Belt
Let’s move onto removing an object.
When we previously changed her dress to a green evening dress, it added a belt, which we’ll now use inpainting to remove.
We’ll switch over to Fooocus.
We have all our base settings already applied.
This time, we’ll drag our previously generated “necklace” image into the inpaint image box.
Now we’ll do a quick mask over her belt, where we want it removed.
Again, we’ll select the “Modify Content” inpaint method, which comes with a default inpaint denoising strength of 1, which is fine.
In the “Inpaint Additional Prompt” box, you would logically think we would need to add a prompt that instructs to remove the belt, but actually, we need to add a prompt clarifying what we want the end result to be, so we’ll add “highly detailed green evening dress”.
Then we just hit the “Generate” button.
Let’s take a look at the result.
On the left, we have our original base image, and on the right, we have our newly generated “no belt” image.
It’s done a good job of removing the belt, and replacing it with matching pleats of the dress material. It could probably have done a bit more of a seamless job, but it’s not too bad at all.
OK, that’s her belt removed, let’s move onto the final inpainting task.
Change Background
Let’s move onto changing the image background.
Now that we’ve finished completing her evening look, I think a night sky background would be more suitable, so let’s use inpainting to change the plain background to a night sky one.
We’ll switch over to Fooocus.
We have all our base settings already applied.
This time, we’ll drag our previously generated “no belt” image into the inpaint image box.
Instead of tediously trying to mask the whole background, we’ll use the advanced auto masking option, that I mentioned earlier.
Below the inpaint image box, we’ll tick the “Enable Advanced Masking Features.”
The advance masking image box and settings will be shown.
In the “Mask generation model” dropdown, there’s a number of different masking models to chose from, depending on what we want to mask.
We’ll select the “silueta” model.
Then we’ll click the “Generate mask from image” button, to auto create the mask.
I’ve already tested all of the different mask model options, and for this particular example, the “silueta” model works best. Other models had problems with masking around her hair strands properly, so you may want to test out different models for your own specific images.
Once the mask has been auto created, you can also use the brush tool to edit the mask further, if you need to.
Anyway, the white area is the inpainted masked area that will be changed.
Currently, it’s set to inpaint her, but we want to inpaint the opposite, which is the background and not her.
So to do this, we’ll reverse the mask by ticking the “Inverse Mask when Generating” checkbox.
OK, that’s the masking done.
Back to our original inpainting panel on the left.
Again, we’ll select the “Modify Content” inpaint method, which comes with a default inpaint denoising strength of 1, which is fine.
In the “Inpaint Additional Prompt” box, we’ll add “highly detailed night sky”.
Then we just hit the “Generate” button.
Let’s take a look at the result.
On the left, we have our original base image, and on the right, we have our newly generated “night sky background” image.
I think the result is excellent. The edges have been detected very well indeed, including around her stray strands of hair.
OK, that’s the image background changed.
Conclusion
Now you know all 4 Fooocus inpainting methods, and how to produce the best results for each of them.
You now know the specific inpainting detailed steps, through a series of worked examples, as we transformed an image with inpainting.
Anyway, hope you found this in-depth inpainting video tutorial helpful, and I’ll catch you in the next one.
Related Videos
Ultimate Fooocus Face Swap Comparison and Tutorial – All Methods Tested:
https://youtu.be/HpjGpK_bVyc


