Ultimate Fooocus Face Swap Comparison and Tutorial – All Methods Tested

Introduction
Hello there and welcome!
If you’re using Stable Diffusion, then FOOOCUS is probably the easiest of all the UIs, to do high quality face swapping with.
However, Fooocus offers 4 MAIN WAYS to face swap, which is just too much choice for me.
I tend to use Fooocus for certain tasks, as it let’s me just get in, do the job quickly and easily, produce high quality results, and get back out.
So in this video, I’ll compare ALL 4 FOOOCUS main face swap methods, to FINALLY find out which method produces the best result.
Then, whenever I need to face swap with Fooocus, I don’t need to think. I just do it, and run with the best method.
I’ll start off by jumping straight into the 4 methods and results.
Then I’ll get into the details, and walk-through the step-by-step process, for EACH of the 4 face swap methods.
I’ll be running through everything, on a standard local install of Fooocus, running on a Windows 11 PC.
So, let’s crack on.
The 4 Fooocus Face Swap Methods
The 4 main Fooocus face swap methods are:
1. Text prompt face swap.
2. Inpaint face swap.
3. Image Variation face swap.
4. ControlNet PyraCanny face swap.
OK, now we know the 4 face swap methods, let’s compare their results.
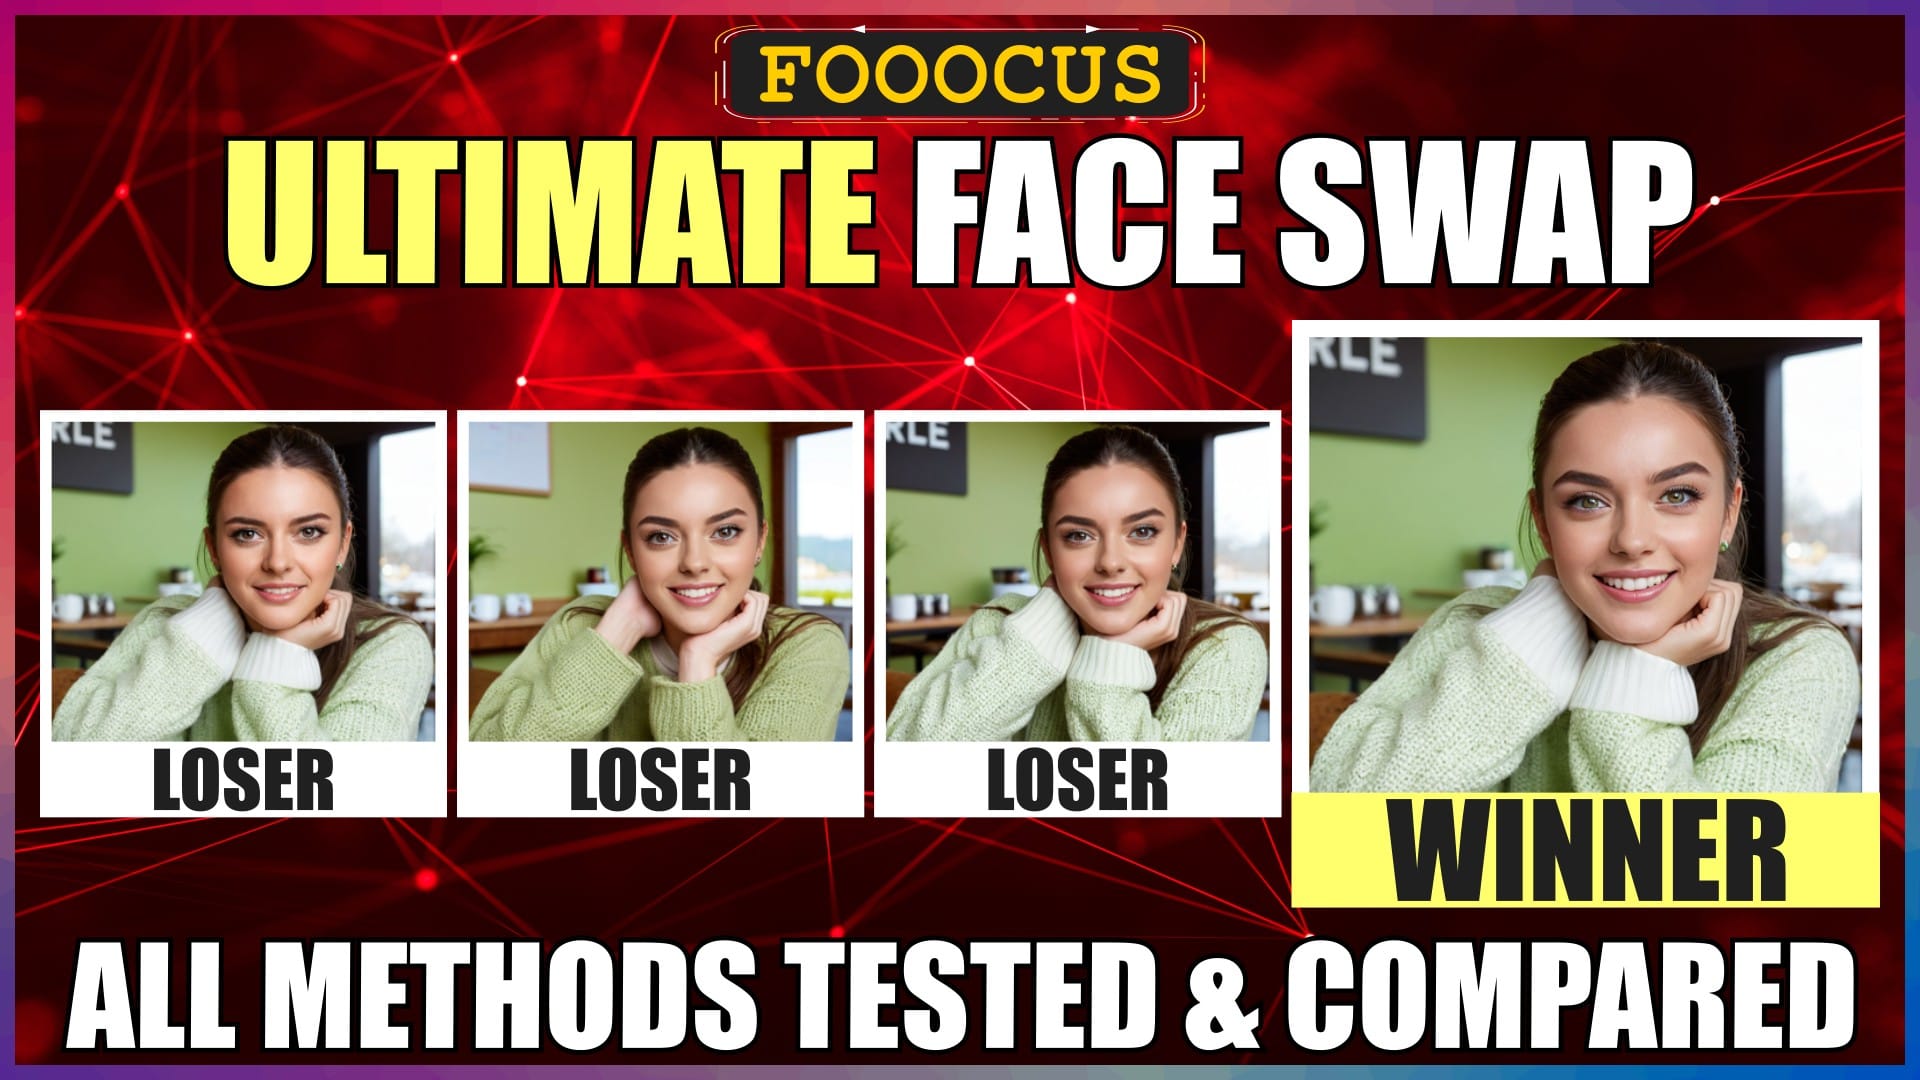
Face Swap Comparison Results and Winner
This is our face image, that we used for all 4 methods.
In 4th place, we have the INPAINT face swap method.
In 3rd place, we have the CONTROLNET PYRACANNY face swap method.
In 2nd place, we have the IMAGE VARIATION face swap method.
And the overall winner, in 1st place, is the TEXT PROMPT face swap method.
So, now you know the results from our face swap comparison testing.
If you want to see more details of each result, then take a look at that method’s section of the video. I’ve put all the chapter timestamps in the description below for you.
Anyway, it’s only fair to add a couple of important disclaimers to these results.
First, this was obviously a very limited test using specific images. Different images may produce very different results.
Second, we didn’t use the power of the additional text prompt for the last three methods. This would almost certainly have produced improved results for those methods.
Third, depending on your particular use case, a particular face swap method may be more appropriate, or even the only option. That’s why it’s a good idea to know and understand, all four of these quick methods, so that you can then apply the best one, as a specific use case arises for you.
Fourth, I only used AI generated source images, which tends to work better and more consistently in Fooocus. Using non-AI images, tends to give quite a substantial range of results, so I avoided this for comparison purposes.
I think, the biggest surprise for me during this comparison test, was how well the text prompt method did and how badly the inpaint method did. Having done a fair bit of face swapping using Automatic1111, I always found that the inpainting method produced excellent results, perhaps due to the fine-tuning you’re able to do in Automatic1111.
Anyway, now you know the results, let’s get into the step-by-step processes for each of the four methods.
Generate Base Face Image
Let’s first get our base face image regenerated, to use with ALL the face swap methods.
Open Fooocus.
Let’s tick the “Advanced” checkbox, to keep these settings shown.
I’ve previously generated an appropriate face image, so let’s regenerate it to use.
We’ll paste the image’s metadata into the text prompt box, and then click the “Load Parameters” button, to populate the fields with the face image metadata.
For settings, we’re using a 1024 by 1024 square aspect ratio, no negative prompt, and the original image seed.
For styles, we’re keeping the standard, V2, Enhance and Sharp styles.
For models, we’re sticking with the default JuggernaultXL model, and the SDXL offset LoRA.
Then we just hit the “Generate” button, to regenerate the image.
Let’s take a look at our base face image.
It’s a good face image. A clear close up of the face, looking directly forward, with all facial features clearly visible.
OK. Let’s move onto the different face swap methods.
Method 1: Text Prompt Face Swap
Let’s start off with method number one, the TEXT PROMPT face swap.
We can see the basic text prompt that was used for our face image.
Let’s edit the text prompt to have her “sitting in a coffee shop, wearing a white turtle neck sweater”.
Now we need to specify the face image, as the face to be swapped onto the new image generation, by way of an image prompt.
We’ll tick the “Input Image” checkbox, below the prompt box.
Then we’ll select the “Image Prompt” tab.
We’ll drag our face image from the generation image box above, into the first “Image Prompt” box.
We could use multiple different variations of our face image, which sometimes gives me better results, but we’ll just use the single face image this time.
Then we’ll scroll to the bottom of the image boxes, and tick the “Advanced” checkbox.
A number of additional settings will open up below our image box.
We’ll select the “FaceSwap” option.
The default “Stop At” and “Weight” values will change accordingly.
“Stop At”, is the point that we want to stop swapping in our face onto the new image generation.
Setting it at 1, will continue to swap in our face right up to the last point.
Anything between 0.9 and 1, generally gives me the best results, but have a play around with different values.
Let’s change this to 1.
“Weight”, refers to the amount of influence that our face image prompt has.
Anywhere between 0.8 and 1, tends to work well for me.
Anything too high, tends to introduce distortions into the final image.
Let’s move this up to 0.9.
We’ll leave the resolution and seed of our original face image. Although you can play with these as well.
Then we just hit the “Generate” button.
Let’s compare the result.
On the left we have our original face image, and on the right we have our face swapped image, that we just generated using a modified text prompt and image prompt.
I think the result is excellent.
It’s not perfect, but very close indeed.
Her skin tone and eye colour is slightly different, but that could be due to the different lighting that you’d find in a coffee shop.
Her facial structure and fine facial details have been replicated incredibly precisely, even down to the wrinkles around her mouth and eyes.
If we did a quick sharpen of the image, I think the result would be even further improved.
The generated image, I think, could absolutely pass as our face image, if we posted it on social media.
So, I’ll give this method a solid 9 out of 10.
Method 2: Inpaint Face Swap
Let’s move onto method number two, the INPAINT face swap.
I’ve regenerated our original face image and added it as our face image to the image prompt, as before.
We’ll keep all the settings as they were for the first method, so that we can get a fairer comparison result.
You can either leave the text prompt empty, or provide some specific pointers to tweak and improve the generated image.
We’ll leave it blank, so that we can get a raw gauge of what the inpaint method produces.
Anyway, onto the pose that we want to put her in.
We’ll use the generated image from the first method, for our pose image, for all of the remaining methods, so that we can compare each method’s results on a more like for like basis.
To do this, we select the “Inpaint or Outpaint” tab.
We’ll drag our pose image into the image box.
Then we use the brush tool to paint over the pose image’s face, to create a mask, into which our face will be swapped.
If we hover over the info icon in the top left of the image box, we can see some handy masking shortcuts.
Anyway, let’s do a quick mask.
The masking doesn’t need to be perfect, but it’s best to go slightly outside of the face line, to improve face blending of the face being swapped in.
Then, to enable the inpaint option and our mask, we’ll select the “Advanced” tab in the top right of the screen.
Then check the “Developer Debug Mode” option.
Then we’ll select the “Control” tab, and in the first box of settings, we’ll check the “Mixing Image Prompt and Inpaint” option.
Now we just hit the “Generate” button.
Let’s compare the result.
On the left we have our original face image, and on the right we have our face swapped image, that we just generated using inpainting and an image prompt.
I don’t think the result is very good.
There’s a loose sense of similarity.
She looks a bit older in the generated image though, and the facial structure is just not right. The face looks more rounded than the original face image.
It’s worth noting, when choosing a pose image, facial structure will be improved, if you choose a pose image with a similar facial structure.
The eyes are not as green as in the face image either.
The other finer facial details are pretty good though, including the wrinkles.
We could go back and tweak some of the masking, and add in some specific guidance in the text prompt to improve the end result, but on this occasion, we’re looking for a raw comparison between the different methods.
I’m doubtful whether this image could pass as our face image, if we posted it on social media.
So, I’ll give this method a 6 out of 10.
Method 3: Image Variation Face Swap
Let’s move onto method number three, the IMAGE VARIATION face swap.
In my opinion, the variation function isn’t really a true face swap method, it’s really aimed at producing variations of the same image, in a similar way that Mid Journey offers you a variation option, after you generate an image.
However, since so many people use it as their face swap method, I thought I’d include it in this test, for comparison purposes.
I’ve regenerated our original face image again, and added it as our face image to the image prompt, as before, with the same settings.
Again, you can either leave the text prompt empty, or provide some specific pointers to tweak the generated image.
Again, we’ll leave it blank.
Onto the pose image.
This time, we’ll select the “Upscale or Variation” tab.
Then we’ll drag in the same pose image, into the image box.
In the “Upscale or Variation” settings box, to the right of the pose image, we’ll select the “Vary (Subtle)” option.
We now need to enable the “Upscale or Variation” function in the “Developer Debug Mode” settings.
On the “Advanced” tab, we’ll tick the “Developer Debug Mode” checkbox, then go to the “Control” tab, and check the “Mixing Image Prompt and Vary/Upscale” option.
Now we just hit the “Generate” button.
Let’s compare the result.
On the left we have our original face image, and on the right we have our face swapped image, that we just generated using image variation and an image prompt.
I think the result is very good.
As expected, it’s pretty close to the text prompt result, but not quite as good.
There’s a couple of funky areas in the image though, such as the right eye and teeth.
The fine face details are pretty much there, but not such an exact match as we got with the text prompt method.
I think this image could pass as our face image, if we posted it on social media.
So, I’ll give this method a decent 8 out of 10.
Method 4: ControlNet PyraCanny Face Swap
Let’s move onto method number four, the CONTROLNET PYRACANNY face swap.
I’ve regenerated our original face image again, and added it as our face image to the image prompt, as before, with the same settings.
Again, you can either leave the text prompt empty, or provide some specific pointers to tweak the generated image.
Again, we’ll leave it blank.
Onto the pose image.
We’ll drag in the same pose image, into the second image box on the “Image Prompt” tab, next to our face image.
Below the pose image, we’ll select the “PyraCanny” option.
We’ll leave the “Stop At” and “Weight” settings at their defaults of 0.5 and 1.
There’s also a ControlNet CPDS option, but it generally produces very similar results to Canny, so I’ve excluded it in this comparison test.
Now we just hit the “Generate” button.
Let’s compare the result.
On the left we have our original face image, and on the right we have our face swapped image, that we just generated using ControlNet PyraCanny and an image prompt.
I think the result is pretty good, but certainly not fantastic.
It’s probably the oversized eyes that throw me off.
Apart from the eyes, the overall similarity is actually pretty high.
Some of the finer details are a bit off, like some of the wrinkles, the eyes of course, and the teeth. The eyes are not the right shape, size or colour, and the teeth protrude a little too much.
I think the generated image could POSSIBLY pass as our face image, if we posted it on social media, AND people were scrolling and not looking too closely.
So, I’ll give this method a respectable 7 out of 10.
Conclusion
Now you know which Fooocus face swap method won in this comparison test, and also know the step-by-step process for each of the four methods.
Now you can go and face swap with confidence and added knowledge.
Anyway, hope you found this video helpful, and I’ll catch you in the next one.
None.


