Merge Checkpoints in Stable Diffusion Automatic1111

Introduction
Hello there and welcome!
In this video, I’m going to walk you through the quick and easy way to merge Stable Diffusion checkpoints in Automatic1111.
There’s a huge number of amazing fine-tuned custom checkpoints available these days, and each comes with its own particular art style and capabilities but also limitations.
If you want to create more unique images, with combined attributes from several checkpoints, then generating images with a merged checkpoint may be the way to go.
If you’ve trained your OWN checkpoint, you may want to merge it with another, to leverage the influence and strengths of that checkpoint.
I’ll be walking through the steps to merge two checkpoints using my local install of Automatic1111, running on my Windows 11 PC.
So, let’s crack on.
Select Checkpoints to Merge
If you’ve already decided that you want to merge checkpoints, then you probably already know which ones you want to merge.
To run through the process steps for you, I’ve selected two checkpoints with contrasting styles, to provide a good basis for visual comparison.
I’m going to merge AziibPixelMix with DreamShaper. I’ve left the links for both checkpoints in the description below for you, if you want to take a closer look at these.
AziibPixelMix is geared towards pixel art and the hugely popular DreamShaper has a photorealistic style.
The contrasting styles should give an interesting and unique merged style.
I’ve downloaded both models already and I’m ready to get merging.
Merge Into Your OWN Trained Checkpoint
Before we jump into the actual merging process and the various settings, it’s worth clarifying some key points, if you’ve trained your OWN model and you’re looking to merge it with another checkpoint.
If this is NOT the case with you, then you can just skip this part of the video and go straight onto the merging process in the next section. Take a look at the chapter timestamps in the description below.
If this IS the case with you, then YOUR checkpoint will always be the primary checkpoint as the starting base, into which you merge IN other checkpoints.
If you’re looking to merge multiple checkpoints into yours, then I’d suggest you don’t just try to merge in two or more others at the same time.
I’d take a more iterative approach, merge in one, adjusting the amount of the other checkpoint’s influence on yours. Produce multiple variations with different weightings of the other checkpoint, until you’re happy.
Then, take this new merged checkpoint and use it as YOUR new primary base checkpoint to merge another checkpoint into.
Of course that’s only my preference, so feel free to experiment yourself.
Anyway, now that’s hopefully clear, let’s get into the merging.
Merge Checkpoint Models
Open Automatic1111.
Click on the Checkpoint Merger tab.
The first set of boxes is where you add your different checkpoints to merge. You can actually add up to three checkpoints to merge, but I’ll only be doing the two.
Remember, if you’ve trained your OWN model, then you should select YOUR model as Model A, with Model B being the one that you want to merge INTO your model.
In my case, I’m not doing this, but I’m using the AziibPixelMix checkpoint as my base and I’m merging Dreams into Pixels.
Drop down the Primary Model A box and select the AziibPixelMix checkpoint.
Then select the DreamShaper checkpoint for the Secondary Model B.
The next box is where you add in a custom name. I’ll skip over this for now and come back to it in a moment.
So, moving onto the Multiplier selection.
The next slider option is where you set the Multiplier effect. This is the important part. It determines how much weighting or influence you’re going to give either model A or B for your resulting checkpoint.
If you slide it completely to the left, to zero, then you’re just going to get the influence of the AziibPixelMix checkpoint and none of the DreamShaper checkpoint merged in.
Setting the slider all the way to the right, to one, will give you 100% DreamShaper.
Since the multiplier scale ranges from 0 to 1, you can effectively consider these in percentage terms.
So, 0 = 0%, 0.3 = 30%, 0.7 = 70% and 1 = 100%. Easy.
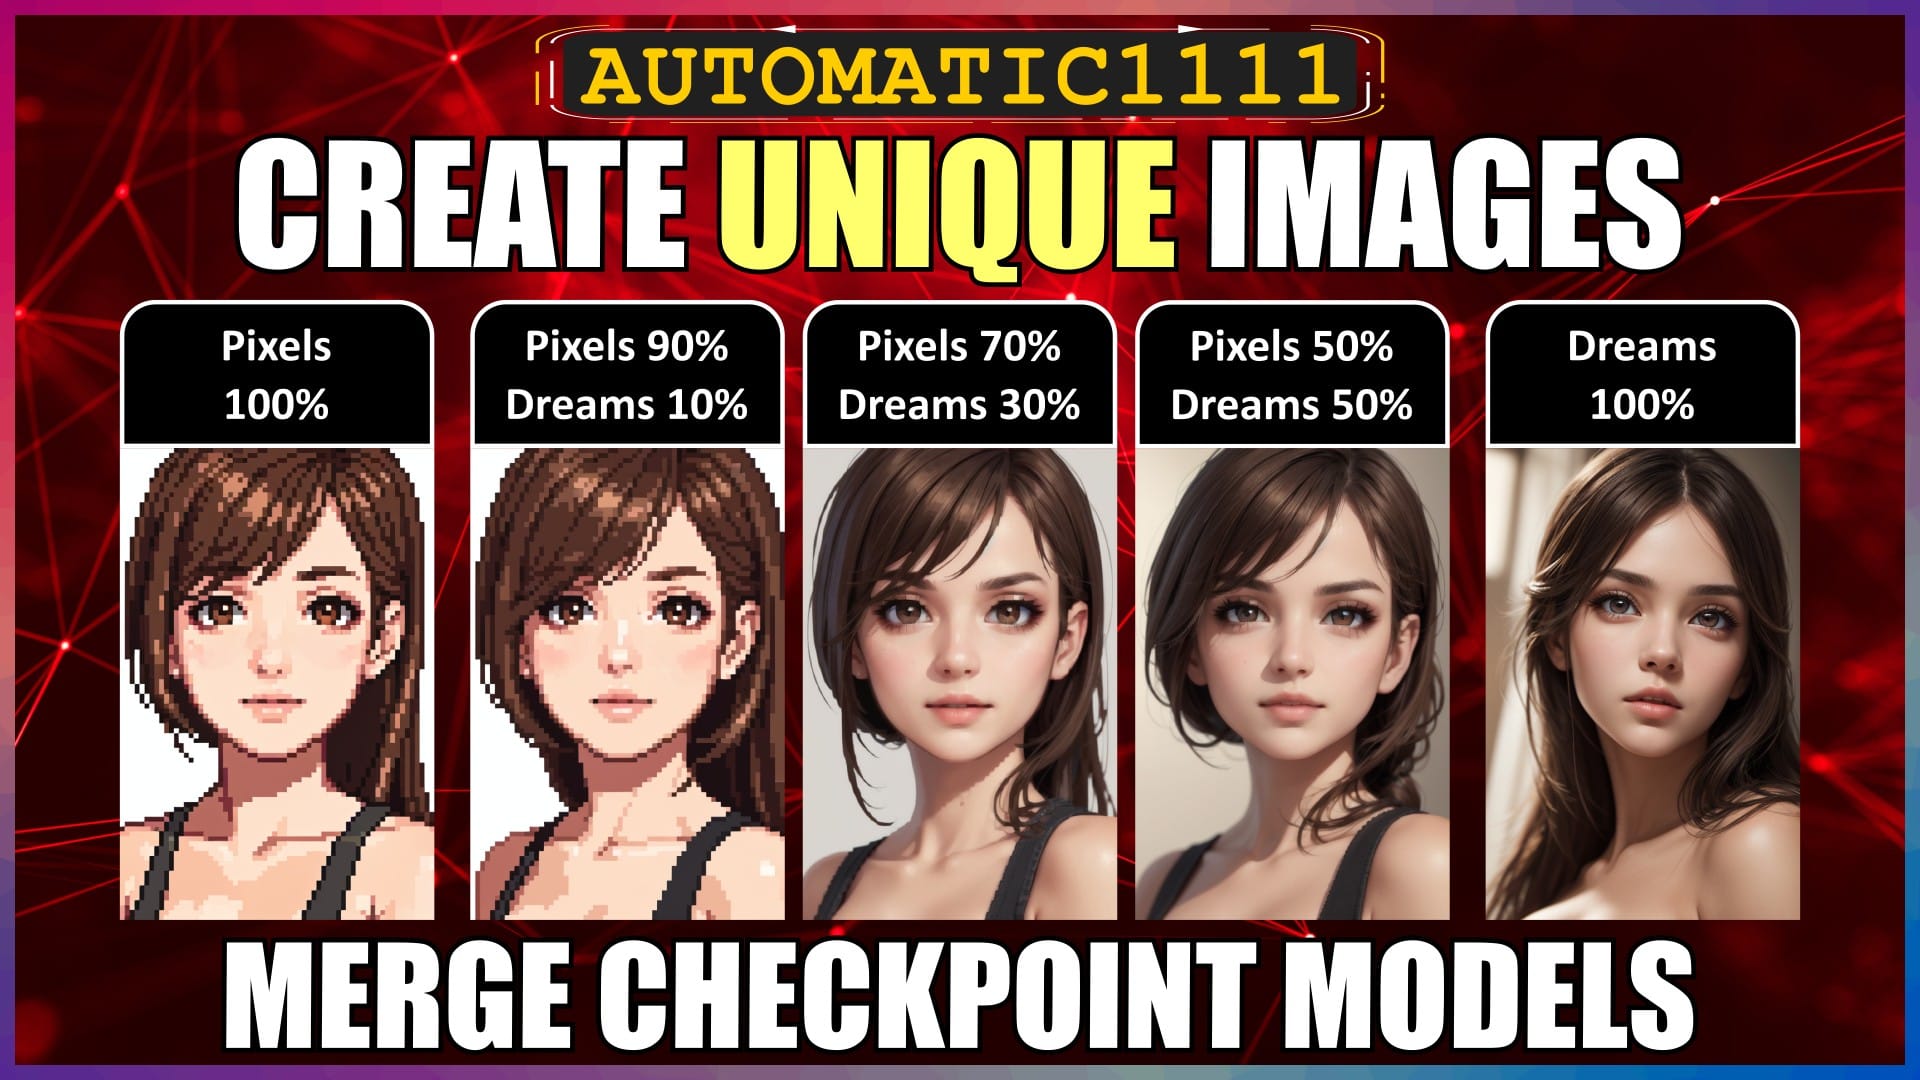
The easiest way to visually understand the amount of model B (on the right) you’re putting INTO your primary model A (on the left), is to take the slider all the way to the right, to one, or 100%.
At 1, you’re putting in 100% Dreams INTO Pixels, leaving 0% Pixels.
Slide it left to 0.7, and you’re putting in 70% Dreams INTO Pixels, leaving 30% Pixels.
Slide it further left to 0.5, and you’re now putting in 50% Dreams INTO Pixels, leaving 50% Pixels.
Slide it all the way to the left to 0, and you’re now putting in 0% Dreams INTO Pixels, leaving 100% Pixels.
Anyway, now that you hopefully understand that, let’s continue.
For our purposes, I think the pixeIation effect with the AziibPixelMix checkpoint on its own is a bit strong, so I’m going to tone that down a bit by setting the slider at 0.3. This gives 30% Dreams and 70% Pixels.
OK, now let’s jump back to the custom name.
Even though adding a custom name is shown as optional, I would definitely recommend that you not only add in a custom name for the new merged checkpoint, but you also make it meaningful, so you can later identify which checkpoints you merged and what multiplier factor you used.
I’ll name it PixelDream-0.3.
The remaining settings we’ll just leave at their default values, which you can see on the screen.
That’s it.
Then we just hit the Merge button.
The merge process won’t actually take that long, depending on your hardware.
Once the checkpoint merging process has finished, a completion message will be shown and the new merged checkpoint will be saved automatically in your models, Stable-diffusion folder with your other checkpoints.
Test New Merged Checkpoint Model
Let’s do a quick check to make sure everything has worked OK.
Open Automatic1111.
On the txt2img tab, drop down the checkpoint box at the top of the page.
You should see your newly merged model in there. Select it.
I’ll generate a quick test image with my new PixelDream checkpoint using a simple text prompt.
In the text prompt box, I’ll type in “young, handsome man, wearing a purple tuxedo”, and press Generate.
The generated image looks good.
It’s certainly got the pixel influence, but nowhere near as much as the base AziibPixelMix checkpoint was giving. The 30% photorealism provided by the DreamShaper checkpoint, has nicely diluted the pixel art effect.
At this point, generate a few test images, to get a good gauge of whether you have the desired influence of the two models that you’re looking for. If you’re not happy, then you can just go back and remerge the original checkpoints and select a different Multiplier.
If you’re looking to merge in a second checkpoint, then you can run the merge process again, using your new merged checkpoint as the base Model A.
AziibPixelMix vs DreamShaper vs PixelDream Merged Checkpoints
OK, I’ve gone away and merged the AziibPixelMix and DreamShaper checkpoints using different multipliers of 0.1, 0.3 and 0.5.
I’ve then generated different sets of comparison images using exactly the same text prompt and settings for each set, using both the original checkpoints and then each of the 3 merged checkpoints that I created.
Sit back and take a look at these side-by-side comparison results, which should help you to visualise the differences better.
Conclusion
Hopefully, the side-by-side comparison results were useful and brought it all together for you.
Now you know how to quickly and easily merge Stable Diffusion checkpoints in Automatic1111.
You’re now ready to go get merging!
Anyway, hope you found this video helpful, and I’ll catch you in the next one.
Links
AziibPixelMix Checkpoint:
https://civitai.com/models/195730
DreamShaper Checkpoint:
https://civitai.com/models/4384
Paths
Save Checkpoints to:
stable-diffusion-webui\models\Stable-diffusion


